


Evergreen for scale models: cutting, gluing and finishing techniques
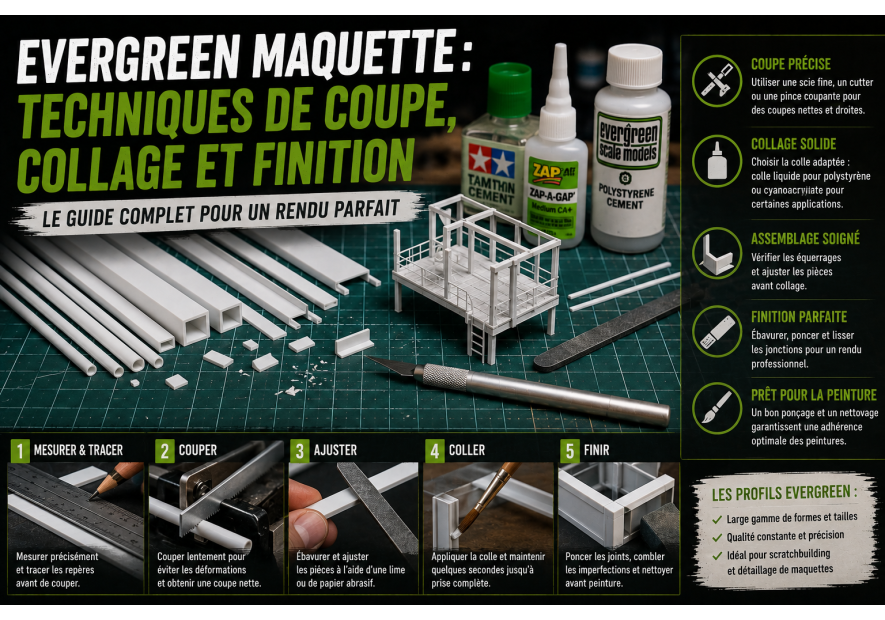
Workshop-oriented Evergreen pillar guide: reliable cutting, gluing, assembly and finishing methods for clean and durable model parts.
Last updated: 2026-07-23
Quick answer
For clean Evergreen parts, use this rule: guided cutting + light glue + alignment control. Most visible defects (warping, glue marks, hollow joints) come from over-gluing or unsupported cuts.
Guide objective
This second pillar complements the reference-selection guide. Here, the focus is workshop execution: turning Evergreen profiles into straight, repeatable and clean model parts.
Table of contents
- Prepare your workstation
- Cutting technique by section type
- Warp-free gluing
- Common assemblies (L, U, frames, spars)
- How to fix mistakes cleanly
- Useful Evergreen workshop references
- Related internal resources
- Workshop FAQ
1) Prepare your workstation
- Use a flat and rigid surface to avoid twists.
- Use simple angle guides (square, metal ruler, spacers).
- Cut in multiple light passes instead of one aggressive pass.
2) Cutting technique by section type
Rectangular strips
Mark and score lightly first, then deepen progressively. This reduces edge crushing and cleanup work.
Round rod or tube
Rotate the part under moderate blade pressure to keep circular geometry, then finish with fine abrasive paper.
Evergreen sheets
Use long guided scoring along a ruler, then controlled snap. For small pieces, keep extra margin and finish to final size by filing.
3) Warp-free gluing
- Dry-fit before glue.
- Apply micro amounts only at contact zones.
- Hold for 20 to 40 seconds depending on part size.
- Allow full cure before sanding or loading the assembly.
Tip: on long strips, glue in three stages (start, middle, end) to keep axis control.
4) Common assemblies
| Assembly | Main risk | Prevention |
|---|---|---|
| Rectangular frame | Open angles | Dry-fit + diagonal check |
| Spar on sheet | Sheet warping | Segment-by-segment bonding |
| L-profile reinforcement | Visual misalignment | Angle guide during initial set |
| Tube on support | Glue squeeze-out | Minimal glue point + fine cleanup |
5) Clean error recovery
- Hollow joint: re-bond locally, then controlled fine sanding.
- Twisted part: disassemble cleanly if possible, recut and rebuild on guide.
- Glue overflow: let cure, scrape lightly, then restore surface finish.
6) Useful Evergreen workshop references
- S1370100 - 0.25 x 0.5 mm
- S1370102 - 0.25 x 1.0 mm
- S1370107 - 0.25 x 4.0 mm
- S1370110 - 0.38 x 0.5 mm
- S1370111 - 0.38 x 0.75 mm
7) Related internal resources
- Brand: Evergreen
- Main category: Evergreen plastic profiles
- Related category: Evergreen rectangular strips
- Related category: Evergreen smooth sheets
- Related guide: Evergreen selection guide
- Related guide: How to paint a scale model
Sources and method
Content is based on live Evergreen product references on the store, product-page dimensions, and a workshop method focused on precision, repeatability and finish quality.
Evergreen workshop FAQ
Why do my strips warp during gluing?
Warping is usually caused by excess glue. Use less glue and bond in short segments while holding alignment.
How can I keep perfect 90-degree corners?
Dry-fit first, check diagonals, then glue while holding parts against a square during initial setting.
Can I sand immediately after gluing?
It is better to wait for full curing. Early sanding can tear the joint and create visible hollows.
Which references are best for a first workshop stock?
References 100, 102, 107, 110 and 111 provide a strong base for most static model tasks.
J+7 - 2026-07-24: Workshop tip: on thin sections, two light scoring passes usually produce cleaner joints than one deep cut and reduce edge deformation before gluing.
Related guide: Evergreen profile selection.
Complete this Evergreen tutorial
To frame material choices, also read the profile selection guide. For final rendering, continue with realistic model painting.
Recommended categories: Evergreen profiles, static models.
After cutting/gluing techniques, you can continue on NextModelKit with the decals without silvering workflow to secure final finish quality.
